Friday, August 7, 2015

Easy-Peasy Weeknight Chicken and Brussels Sprouts

Hello, folks! It has been CRAZYPANTS around here! My second child, a little boy, came along in June, and five minutes later, I'm in my last week of maternity leave! And, just like with the first, all of those great little projects I had planned to do during my time off still sit, sadly untackled, amidst the unfolded laundry and dirty dishes. At least I showered, right?

Not that I haven't enjoyed myself, of course. Sure, I have to change my clothes three times a day- made all the more tiresome by the fact that I only fit into 3 outfits- and two cups of fully-leaded coffee has become my new minimum. But let's face it: babies are perfect. They can't talk back, they can't get into things. They just smile and make baby noises and smell amazing after a bath. A much needed bath, since diapers are apparently a complete waste of money on boys. I have to keep waterproof pads under this kid when I hold him.

At the moment, both kids are napping. Well, if we're being honest, Bumblebee is napping, and Ladybug is lying in bed, wide awake, under strict orders not to get up from that bed under penalty of death. Okay, not DEATH, but penalty of no "Angelina Ballerina", which gets approximately the same reaction. Mama needs a breather! Don't give me that look. We're coming off of a double-ear infection (her) and a runny nose (him), equating to some SERIOUS sleep deprivation (me). This is where you chime in with "Oh man, I've been there!"

In this blessed moment of quiet, I figured it was high time I shared my secret for getting dinner on the table- ever- with two tiny children: Pan-fried chicken and baked Brussels Sprouts.

This is one of my daughter's favorite meals. She's not always a fabulous veggie eater, but she will gobble these sprouts up and ask for more. And the chicken, oh this chicken. It is so easy, so fast, and you will want to make a ton of it so that you have extra to throw on your salad the next day. Also, if you're pregnant and 4 days late, it's a great chicken to make while dancing around your kitchen in a desperate attempt to induce labor. True story. Didn't work (he was 6 days late, in case you were wondering).

Okay, here we go: Weeknight Chicken and Brussels Sprouts

Preheat your oven to 400 F and throw a cookie pan in to preheat with it. If you can get it together enough, it's handy to halve your sprouts the night before and save yourself a lot of time. If you're me, well, that never happens. Rinse, dry, and chop your Brussels sprouts in half, and put them in a large bowl. Toss with EVOO, salt, pepper, and garlic salt.


Once they are evenly coated, throw them onto your preheated pan and try to arrange them face-down.


Bake them for 25 minutes, or until they look like this:


They will be a little crispy on the outside and soft on the inside, with a ton of flavor. My dad, who is not a Brussels sprouts fan AT ALL, will eat a large helping of these babies. This recipe can also be used for Green beans or asparagus. Cook asparagus for 20 minutes and cook green beans for 40. Hooray for versatility!

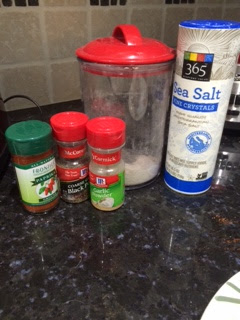
While your sprouts are in the oven, it's time to work on the chicken. Line up your ingredients and take a picture commemorating the night you put away the takeout menus....even if you get them back out tomorrow. No judgment. I'll probably order pizza tonight. Anyhoo...


KAPOW!!!! Could that be simpler?

In a Gallon ziplock, combine paprika, garlic powder, salt, and black pepper. Shake thoroughly to combine. Add the chicken, seal, and give it another good shake, until all of the seasoning is coating the chicken fairly evenly. Doesn't have to be perfect.

Open the bag back up and add the wheat flour. Shake again to coat.


Note: this is a great job for your little one. As Jessica Chastain eloquently put it in "The Help", "This is so much fun!"


If you haven't seen it, rent it. Read the book first, and then be impressed with how unusually true the movie is to the book. Purists, rejoice!

I digress. In a large saucepan, heat oil on medium heat. In batches, fry the chicken strips, about 3-4 minutes per side. Each side should look like this:


 That's it. Just plop them in there, and flip a few minutes later. Update your Facebook status while you're waiting ("Guess who's making dinner from scratch tonight? THIS GUY! OMG LOL SMH YOLO, et al.")

Serve your delicious dinner with a nice vase of flowers and a bottle of Chardonnay. Milk for the kiddos, though. 'Cause, you know, Social Services and all that jazz. Revel in your significant other's disbelief, and try to ignore them when they search the hall closet for a secret housekeeper.


This chicken is so easy to chop up and add to pastas, salads, on top of homemade pizza, or even while you're still standing at the stove, finishing up the last batch because you just couldn't wait that long. If you have a few extra minutes, go ahead and double the recipe. You'll be glad you did.


Easy Baked Brussels Sprouts
Prep Time: 10 minutes
Cook time: 25 minutes

Ingredients:
1/2 lb Brussels Sprouts, cleaned and halved
1 Tbsp Extra Virgin Olive Oil
1 Tsp Garlic Salt
Salt and Pepper, to taste

Preheat oven to 400 F. Take a large, ungreased cookie pan and put it in the oven to preheat.
In a large bowl, combine sprouts, EVOO, garlic salt, salt, and pepper, and toss until evenly coated.

Pour Brussels Sprouts onto your preheated pan, and arrange so that the cut side is face down.

Bake for 25 minutes, or until the outer leaves start to brown. Serve immediately.


Easy Weeknight Pan-Fried Chicken
Prep time: 5 minutes
Cook time: 15 minutes

Ingredients:
1 lb Chicken Tenders
1 Tbsp Paprika
1 Tsp Garlic Powder
1/2 Tsp Salt
1/2 Tsp Ground Black Pepper
1/4 C Wheat Flour
1/4 C Canola or Olive Oil
1 Gallon Ziplock Bag

Pour oil into a large saucepan and preheat on medium heat.

In the ziplock bag, combine paprika, garlic powder, salt, and pepper, and shake until well mixed. Add chicken and shake vigorously until fully coated. Add flour to the ziplock and shake again to evenly coat the chicken.

Using a fork, remove 3-4 chicken tenders from the bag and lay them in the pan. Fry each side for 3-4 minutes, until fully cooked. Remove chicken from oil and repeat with next batch until all of the chicken is done.


Monday, March 23, 2015

Sneaky Healthy Pumpkin Waffles

Hello there, friends! Happy Spring! We still have snow on the ground, but birds are chirping in our ears...literally, right outside my bedroom window each morning. The transition from winter to spring always gives me such an energy boost- very much needed, as I am now only two months away from the birth of baby #2!

Also helping with the extra energy is my recent transition to part-time, enabling me to get in some important Mommy-Ladybug 1:1 time while I still can. More snuggles, more dress-up games, and more healthy, home-cooked meals for my rapidly growing girl.

This morning, we are having a lazy day. Ladybug, after having her morning sippy of milk, fell blissfully back asleep for TWO HOURS, and is now in a lovely, adorable mood. And such a lovely, adorable child on a lovely, sunny morning deserved a special breakfast. Thus, I pulled out my trusty Mickey Mouse waffle iron and set out in search of a good waffle recipe.

Right away, I knew they had to be pumpkin waffles. I know it isn't anywhere near fall, but sometimes the mood just strikes. Blame it on a pregnancy craving. I found a lot of yummy-sounding recipes, but I wanted something with more of a nutritional punch. Using this recipe.here as an inspiration/guideline, I set out to make my own version of yummy, HEALTHY pumpkin waffles.And yummy, they were!!!!!

You will need:

2 cups whole wheat flour
2 tsps baking soda
1 tsp cinnamon
1 tsp allspice
1/2 tsp salt
2 tbsps brown sugar (optional)
3 tbsp coconut oil, melted and room-temperature
1 egg
1 c organic pumpkin puree (bpa-free)
1 1/2 c unsweetened almond milk (I use So Delicious Almond PLUS, which has extra protein)
1 tbsp flax/chia blend (or all flax or all chia, or whatever you'd prefer)
3/4 c halved pecans

Step 1: Put on your cutest apron...


Just kidding. This pic is actually from Ladybug's and my Christmas Cookie Baking Extravaganza...also known as the day my kitchen got so covered in powdered sugar it looked like it had snowed indoors.

An apron is not really necessary with this recipe, unless you're like me and putting on a cute, frilly apron helps you get into character. What can I say? I was a theatre kid, and it clearly runs in the family.

Seriously, though...

Step 1: In a large mixing bowl, whisk together flour, baking soda, cinnamon, allspice, and salt until evenly combined.

Step 2: In a separate bowl, whisk together coconut oil, egg and brown sugar. Add to dry ingredients and mix well.

Step 3: Stir in can of pumpkin puree. Dividing into two parts and blending slowly after each, add in Almond milk.

Step 4: Add flax/chia seeds and pecans and mix until combined.

Step 5: Heat and spray your waffle iron and evenly distribute the batter. For me, this involves gently spreading the batter up into the Mickey ears before closing the lid.

Step 6: Drizzle with maple syrup, powdered sugar, or whatever your favorite toppings are. Keep wet ones handy, or a fire hose, depending on how much syrup you gave your little one.

I got 10 Mickey Mouse waffles out of this mix, so with a regular waffle iron, I would estimate you'll get about a dozen. Don't forget to freeze the leftover waffles, as they make great, fast toaster treats to bring in the car on busy mornings.


Friday, December 19, 2014

Christmas Hanging Baskets

Merry Christmas, folks! I'm sure that many of you are already completely prepared for the holiday. Your house is fully decked out, your tree is trimmed, your gifts wrapped, and your menu planned. Hats off to you. For us normals over here, we're still be scrambling to get everything ready before C-Day. My tree is up, but not decorated. My house has lights...on most of it. And the presents are....well, let's just not talk about it.

One thing that always bugs me in that fall-to-winter transition period is how sad and lonely my front porch looks when my hanging baskets go away. They leave a big gaping hole and there's nothing left to draw attention away from the ugliness of my door and windows. So depressing. So in the interest of filling that void and giving you a very easy DIY Christmas decoration idea, here's my genius, revolutionary, life-altering idea: CHRISTMAS hanging baskets. Right???? (Okay, maybe not LIFE-ALTERING, but they look pretty and festive and they make me happy, so take your judgments elsewhere. Grinch.)

A few cheap items make this really easy to pull together:
1. Wrought-iron hanging basket
2. Wide burlap (12 inch is best)
3. Pine cones (I couldn't find enough, so I got one of those cinnamony bags of them they sell at Michaels)
4. Christmas balls (non-breakable...learned the hard way)
5. Battery-operated Christmas lights

Loosely wrap and bunch the burlap all around the inside of the basket until it is fully lined. You will have to play with it and tug it through the other side a little bit until you get it the way you want it. As long as it looks good on the outside, that's what matters. It can be a big old mess inside; you're just going to fill it with stuff.

Fill the basket with pine cones and Christmas ornaments or whatever you want to fill it with. I like shiny red Christmas balls because I feel they're the easiest to see, but obviously, creative license and so forth.

Weave a strand of battery-operated Christmas lights around the basket, in and out of the wrought iron, and tuck the battery pack into the burlap so that it's hidden, but you obviously still want to be able to reach it to turn it on and off. **NOTE: Make sure the battery pack is okay for OUTDOOR use. Also learned that the hard way. :(

That's it! Here's a picture of how mine turned out:

This picture and the tutorial are actually from last year. I didn't have a blog then, so I just threw it on Pinterest as a user-upload, but figured this year, I should do right by these baskets. Pretty, isn't it?

Please let me know how your baskets turn out, and if you have any fun tweaks!

Happy Holidays!!!

Saturday, September 13, 2014

Pizza Cupcakes!

Once upon a time, a silly woman asked her two-year-old, "what would you like for dinner?" The toddler impishly replied, "Cupcakes!" Undaunted, the mother asked her what kind of cupcakes she wanted. "Pizza!" declared the child. The mother did a quick inventory of her kitchen: Leftover meatballs, pasta sauce, crescent roll dough, and mozzarella cheese. Eureka! And thus, the pizza cupcake was born. True story!

This is such a simple, economical recipe that I just had to share. The first time I made these, they were such a hit in my house that now every time I make meatballs, I make a little extra so that I can stretch them into two meals and make pizza cupcakes. Well-fed family + budget-friendly = HAPPY MOMMY!

You will need:
  •  5-6 medium-sized meatballs, precooked.
  • Extra pasta sauce (about 1/4 cup)
  • Shredded cheese (I use skim-milk mozzarella)
  • Crescent roll dough or the crescent roll non-perforated sheets, if you can find them.
The first time I made these, I didn't even have shredded cheese in the house, so I grated a pack of string cheese. Totally worked!


Preheat oven to 375. Grease cupcake pan and set aside.

Chop meatballs into small chunks and toss them with extra pasta sauce.


Roll out dough and, if perforated, press out the perforations. Cut into 12 squares and press squares into cupcake pan.

Scoop about 1 tbsp of meatball mixture into each cupcake on top of the dough and sprinkle with mozzarella cheese (Ladybug likes to help me with this part).


Fold the corners of the dough slightly down over the cupcakes. Bake for 10-12 minutes until edges are golden brown. Let cool for a few minutes and then use a fork to lever them out of the pan. 


Cut in half to let cool a bit before your toddler tries to dig in!


These have been such a huge hit in our house. I even served them as an appetizer at a Girls' Night I hosted last weekend! They're also fun because you can really get experimental. Try them with mushrooms or a slice of pepperoni on top. If you have any fun variations on these, please leave them in the comments. Thanks, and enjoy!


Monday, June 2, 2014

DIY a Mary Poppins Hat, Spit-Spot!

Hello again! It seems ages since I last updated my blog...probably because it's been ages since I last updated my blog. Please forgive me. It's been one crazy spring! After five months of winter (yes, five! So much for it being 'always sunny in Philadelphia'!), it finally stopped snowing, and we emerged, pale-faced, into this bright, blinding thing that I've learned is called "sunshine", and have since tried to enjoy it as much as possible. Meaning a lot less time spent in front of a computer screen.

Today, however, it is raining. Not just raining. Monsooning. Tempesting, even! I'm half expecting Moby Dick to drift past my window. Perfect day to post a DIY tutorial for making a Mary Poppins hat. After all, who better to remind us of robins feathering their nests, jolly holidays, and other fair-weather activities than the world's most practically perfect nanny?

So as promised in my last entry, Well Begun is Half Done (Otherwise Entitled, How to Throw a Mary Poppins-Themed Birthday Party from Scratch), and without further ado, here it is.

How to Make a Mary Poppins Hat from Scratch

Supplies needed:
Black felt
Black (or whatever your preference) ribbon, 1-1.5" wide
Black thread
Fake daisies and red berries or red flowers
Hot glue
Glitter spray

Let's get started (and Michael, stop stravaging along behind!).

First, measure the circumference of your child's head. Using a compass- or if you're cool like me, a bowl the approximate size of your kid's head, like this nifty Star Wars bowl from Pottery Barn Kids, will do nicely- trace a circle onto the felt that is a little bigger than your measurement. You need to account for extra room in the hat (you don't want it to be tight), and also because we're going to add a slight ruffle, so you need some slack. Then trace another circle around the outside of that one, making it about 5 inches wider in each direction.


The inside circle will be the top of your hat and the doughnut will be the brim.

Next, you'll want to draw and cut out a rectangle in the felt with a length approximately equal to the circumference of your smaller circle, and about 4 inches wide. This will be the band of your hat.


Cut this piece out and pin the two ends together, overlapping by about a 1/2 inch. Stitch together.


Next, we're going to attach the top to the band. Make sure that the sides where you've outlined in chalk are on the outside, as we are sewing this part inside-out.


This part was pretty simple. I just hand-sewed the base to the top and flipped inside-out. I then manually pinched the crease to slightly rotate the fabric until I got it in the shape that I wanted.

Note: I don't really know how to sew, so I hand-stitch everything. I'm sure someone who knows how to sew could hammer this out much more neatly, but this is how I did it. If you have any suggestions for improvements, please post them (politely!) in the comments.

The next part, attaching the brim, is a little trickier but still not hard to do. Make sure the hat is turned right-side out before you begin, and make sure that you are attaching your brim so that the chalked side will be on the bottom. Carefully sew the edges of the brim and the hat together. Every so often, pinch the brim fabric together to make a tiny fold and sew that down, switching the direction that the fold is facing each time you do it. That will create the little ripple effect you see here:

And of course, here:

Don't put in too many; just enough to give it that floppy look.


Now that you have your hat created, the fun part starts! Cut a piece of the ribbon the same length as your rectangle to fit around the hat, and hot-glue it around just above the brim. I would recommend putting dots of hot glue as opposed to using an allover adhesive, since we're going to be wedging a few flowers down behind it.

Of course, you can arrange the flowers any way you choose, but for a true Mary Poppins hat, you need that one daisy sticking up right behind your right ear. Otherwise, it's just another black hat, and "not at all attractive, to my way of thinking!"


I couldn't find fake berries at the craft store that weren't super expensive, so I just used little red flowers and I think it has the same effect. However, for the sake of authenticity, I do recommend using berries instead.
Arrange them sporadically with just a few daisies:


Once your flowers are added and dried, grab that glitter spray! If you watch the movie closely, you'll see that her hat has a bit of a glint to it. You may say that this effect comes from the laquered paint on the straw (no, her hat is not really felt. If you can figure out how to weave one out of straw, write your own darned tutorial); I say it's because she is magical!

Take your hat outside and lay it on some newspaper. I would put give yourself a wide berth with the newspaper, or you may end up with a very sparkly, festive porch like I did. It washed away, but not before giving my husband a slight stroke.

Shake up the can and lightly spray all over the hat, keeping it about 3 feet away from the hat. You don't want to go overboard, just give the hat a nice little sheen to make it extra special.


And voila! Your very own Mary Poppins hat, suitable for travel and high adventure! 

Thursday, March 27, 2014

Well Begun is Half Done (Otherwise Entitled, How to Throw a Mary Poppins-Themed Birthday Party from Scratch)

Even I think I'm an idiot. After the maelstrom that was Ladybug's first birthday party (30+ adults crammed into our little cape cod along with two dogs, ten children, and one bathroom), I declared, to my husband's euphoric relief, that next year would just be a small, simple family gathering. Dare to dream, Daddy. Dare to dream.

It's really his own fault that he fell for that. I mean, does he even KNOW ME? Even a small family gathering (which still totaled twelve adults, three kids, and yes, the two dogs, by the way) has to have a theme, decorations, homemade appetizers, etc. At least, it does when it's to celebrate my precious little pumpkin's 2nd birthday!!! As I mentioned in a previous post, my daughter's recent obsession has been Mary Poppins, and there are FAR worse choices in my book! Julie Andrews = Perfection. This is not up for debate. So, just in case I lost you along the way, my brilliant plan was to throw a Mary Poppins-themed  Oh, the fun I shall have!

Pop quiz: How many MP-themed party decorations do you think they have at the party store? Any party store? Answer: NADA! Well, no matter. I have Pinterest at my disposal, which means I can do anything, right? And as Mary Poppins would say, "There's time. There's time. Spit-spot!" And off I went to figure out how to put this party together from scratch. There was one fleeting moment where it occurred to me that picking a different theme would be a much simpler solution, but who likes to make things easier on themselves ("Bert, what utter nonsense! Why do you always complicate things that are really quite simple?")? Work hard, not smart, I always say! Besides, in my excitement, I'd already told my mom, my in-laws, my best friend, the pediatrician, and the clerk at Michael's about the fabulous Poppins party I was throwing. I was committed (and not in the way my hubby suggests I should be....committed).

Pinterest offered very little along the lines of Mary Poppins DIY, I'm sad to say. I did find these adorable penguin cookies here, but I had trouble opening the site, so I just used the picture as a guide. Mine didn't turn out quite as nicely, but they got the point across.


Also a good guide if you're making Elvis cookies (as my sister kindly pointed out). Warning: the black food coloring will turn your teeth and tongue black. Just another reason to be anti-food coloring, but unfortunately, time was a factor. Also, even if I had the time, I have no clue how I would have made black food coloring naturally. If you have any suggestions, let me know. I really don't like using food dyes.

Kites are also a necessity at a Mary Poppins party. These were really easy. I found my inspiration here. For mine, I found foot-long craft sticks at Michael's and had my husband cut some of them down to 8 inches to work as the horizontal pieces. Then I glued them to the back of a piece of scrapbook paper in a cross shape and folded the paper in over them to form the diamond shape. I did the first one as a guide and my husband did the rest. Isn't he a good egg?:


For the tails, I just bought a spool of pastel-colored gift ribbon and tied bows, cycling through the different colors. The ends I just curled with scissors. So simple, but they were really cute. I saved them to possibly use as decoration when I eventually redo Ladybug's bedroom. 

As another simple decoration, I also cut bits of lace trim I had leftover from a tree skirt I'd made at Christmas and wrapped them around mason jars with batches of daisies. I thought they gave the party a nice touch of turn-of-the-century charm. Do you agree?


The cake was a little trickier. I scanned Pinterest and couldn't find anything that would really work (at least, not that I could do myself. There are some AMAZING cake artists out there, yo!) 
I decided to do a sheet cake and add black fondant cutouts to give a nod to the Broadway version. Here's a pic of my inspiration:


For the sheet cake, I used this wonderful recipe here and my own vanilla buttercream icing recipe (if you're nice, I may share in a later post. Don't get too excited, it's not fancy). I printed out a skyline silhouette and the outline of Mary Poppins from the Broadway pic and cut them out with an X-Acto knife to use as tracers. I picked up the black fondant at Michael's (my home-away-from-home, if you couldn't tell). Here's how it came out: 
I found little candy daisies at Michael's that I used around the rim. I was going to add a blue rosette trim around the base, but unfortunately, I ran out of time. Actually, the cake was only half decorated and I still had appetizers to go into the oven when my guests arrived, so my sister did the lettering with the little candy balls. I should have invited Admiral Boom to the party to keep me on track! I also should have added an extra tablespoon of milk to the icing because as you can see, it didn't spread very neatly. Oh well, live and learn! I thought it turned out nicely overall, and it was delicious! 

The creme-de-la-creme, however, the spoonful of sugar, if you will, was definitely my Mary Poppins hat. This was yet another area where Pinterest failed me and I had to improvise, but I was really happy with the results.


 I will include the tutorial in my next post, but there you have it! Note: I did strive for authenticity, but the fake red berries were too pricey, so I subbed these little red flowers for a third of the price. 

So overall, I pulled it off. My little ladybug had a great party and is still singing "Happy birthday to you" everywhere she goes. She has also been stacking her toothpaste on top of her spit cup and pretending to blow out the candles on her "burday cake." Fortunately, the cup has been empty (ahem) almost every time...

Friday, February 28, 2014

2 days to the TERRIBLE TWOS!

Oh, that moment. Parents, you know the moment. That moment when you look at a picture of your sweet, beautiful, perfectly blissful little newborn before turning to look at the funny, adorable, clever little DEMON that they've turned into and you wonder what the hell happened! I have had quite a few of these moments recently. Somewhere along the line, my not-quite-two-year-old has learned to negotiate. Her new favorite response is "Tye it (try it)", and she is quite liberal with its usage. Some examples for your amusement and commiseration:

Ladybug: Mommy, cogor (color)!
Mommy: Honey, I can't color right now. I'm driving, and we don't have crayons in the car.
Ladybug: Mommy, tye it! Cogor, peesse (please)!"
Mommy: Honey, we're almost home. We can color when we get home, but Mommy's driving right now. You'll have to wait.
Ladybug: [Scream!!! Scream scream scream, cry hysterically, screech, flail, scream scream scream]

Mommy: Baby, Mommy doesn't want to drink the bath water. Yucky!
Ladybug: Tye it!
Mommy: No, we don't drink bath water. It's dirty.
Ladybug: Tye it!
[Lather, rinse, repeat]

Mommy: Honey, no pinching! Pinching's not nice!
Ladybug: Okay, Mommy pinch Ladybug?
Mommy: Mommy's not going to pinch you, either! Pinching's not nice!
Ladybug: Mommy, tye it!

Heaven help me. How is it, parents, that we can want to wring our little angels' necks one minute, and the very next just want to hold them in our arms until the end of time (and vice versa)? They wield such power, these little imps of ours.

Having now survived two whole years of mom-hood with only minor battle scars, I feel compelled to share with you my new-found wisdom. For what it's worth, here are a few tips that you won't find in books. Heck, they may even contradict the books. Books are overrated.

1. Everything can be a hat. EVERYTHING. Colanders, dish towels, diapers, your bras. All will eventually become hats. Learn to view every item as a hat and make sure all items that do not belong on heads are well out of reach (yogurt cups, speaking from experience).

2. You see a hat box, a chair, a lego table....they see stairs to your bed. Children are brilliant abstract thinkers.

3. You will become so used to children's music that you will forget to turn it off once they are no longer in the car. Extra points if you're singing along. Okay, this isn't so much a tip as a warning.

4. You are a more versatile entertainer than you think, so go ahead and sing your heart out. It doesn't matter if you don't know a song, because they don't know the difference. Brushing teeth, brushing hair, washing faces, picking up toys all become less of a battle if you sing about it. Dancing helps, too. Ladybug and I frequently do the twist in front of the mirror during tooth brushing time.

5. They weren't exaggerating when they said children are parrots. My daughter added "oh, sit" to her favorite phrases for about two weeks last fall. Luckily, she really thought somebody said, "oh, sit", so she would use it in that context ("Mommy sit! Sit down! Oh, sit!"), but it was pretty clear what she'd really heard. Whoopsies! So watch that potty mouth, Sailor!

6. Don't correct their pronunciation on those precious little words. I promise they won't be in middle school and still saying "milp" instead of "milk" and "opee" for "open" (this happened in one weekend for my baby, and it was painful). Trust me, your heart will break when those words are gone.

7. It is never too soon to start teaching manners. If your kid can say "more", they can learn to say "more, please." Then you can pat yourself on the back for having a baby with better manners than most teenagers.

8. Impromptu dance parties are a completely valid excuse for lateness. At least once in awhile.

9. No matter how much of a monster they've been all day, all they have to do is fall asleep in your arms and you remember how perfectly marvelous they are. So let them fall asleep in your arms once and awhile, because you can't beat that feeling. And when they're awake, remember that that there is no such thing as too many hugs and kisses.

So there you have it. The sum of my wisdom after two years of this insane adventure. Every parent is different, so I would love to hear your tips and anecdotes in the comments. Good luck, folks! It's a jungle out there!